workbench design software
“+10,000 Step By Step Plans …even if you don’t have a large workshop or expensive tools!“ Yes, Get Access To 12,000 shed Plans! 👈
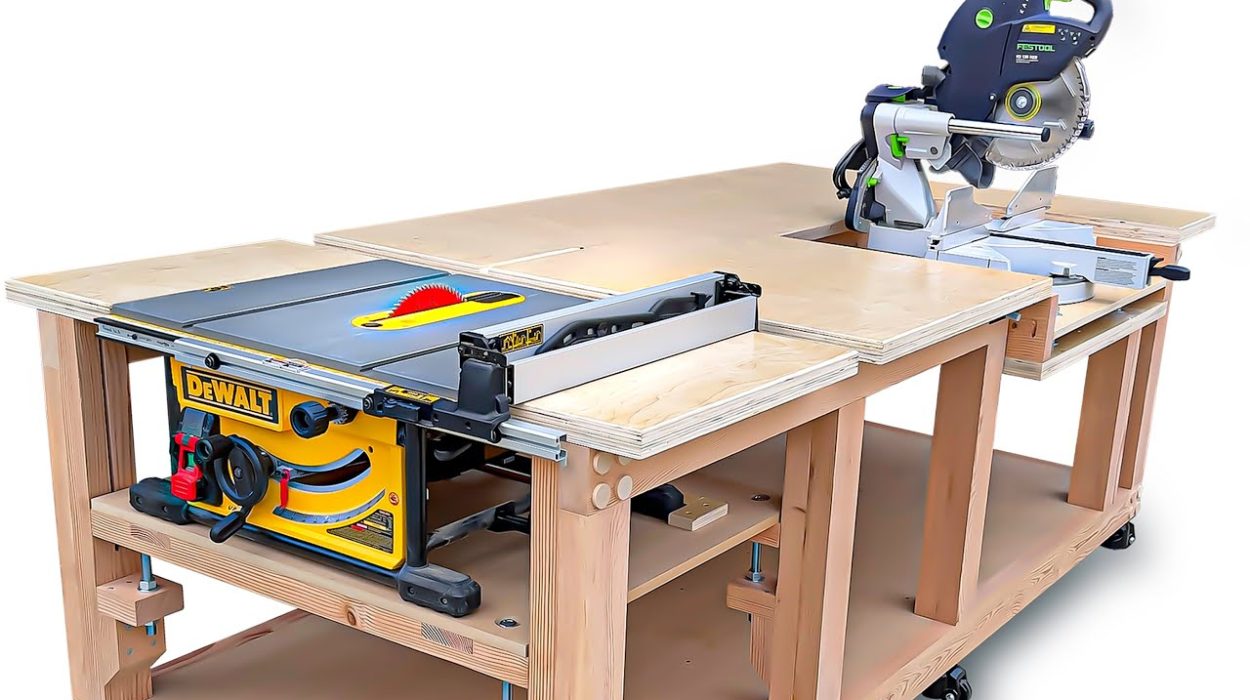
Hey everyone, I’m Paul, I live in Canada, On an island. One fine day I bought some wood, and built a workbench. Then I made some plans, and a Youtube video. If you want to check out that video, ill leave a link in the description Some people actually liked it! and they sent me messages, and then I started to notice Something… if I ever plan to included a flip top section for the miter saw? So I got to work. I modified my original design. Oops, hold on… Ok, I redesigned my workbench to include an adjustable rotating shelf for the miter saw, but before I take apart my work bench to include the shelf, I first made this prototype out of scrap wood. I also made this bracing that holds the shelf and connects it to the workbench, with these, 3/4 inch black iron pipe, and these flanges. So I did all this to help understand what I was getting myself into, and hopefully learn something. Well, I did, I learned three things: One, not all flanges are equal. This one rocks back and forth, when compared to this one. So if anyone ever builds a rotating shelf using flanges, route around in the box for some good ones. Two, I made this shelf to be adjustable, in many ways, When I went to adjust it, there wasn’t enough room. And finally three, this angle, it allows the shelf to rotate unimpeded, and the first time I tried to rotate it, it didn’t Well that’s enough, and lets get into the build, well, actually, It’s the opposite. This new design calls for 9 legs, so I need one more, and it just so happens that I made a mistake on one of the legs in my first video, I tried to fix it, long story short, it ended up on my shelf, for another day. Well, off the shelf it comes, because that day’s today. I think that leg is determined to be part of my workbench. Ill just take this time to mention for any of the products that I use, if you are interested, Ill leave a link in the description below. Will Im pretty happy with how it turned out, and it kind of reminds that nothing’s perfect and there’s usually a way to overcome my mistakes. For this next part, ill be using a dado blade, to cut in a rabbet joint, for this new leg. I learned something about making this cut from a comment on my last video. Instead of one cut at full depth, its safer to build up to the depth you want by making multiple passes, raising the blade each time, until you reach your desired depth. As I’m fastening these legs to the assembly, I had the idea to place a straight edge across the top, just to check the fit. Things look pretty good until I got to the new leg. There’s a pretty good gap when compared to the rest. You may already know, but if not, I’ll introduce you to the power of a playing card. They are really Handy. Ill use it as a shim to close that gap, and bring it in line with the others. Now Ill modify the lower shelf, to accommodate the new location of an existing leg, and the addition of a new leg. And since I’m here, I mid as well fill the hole where one of the legs used to be. And with the lower shelf now complete, ill take this time to level the assembly using the levelling casters I installed earlier. And this will help to ensure the upper stretchers are just as level as the base. I needed one more piece of wood for the upper bracing, but all I had was this warped one, and I don’t have a jointer, so, Ill place shims around it so it doesn’t rock, then secure it with tape so it doesn’t move. Now I need two rails, so Ill cut this old floor board in half, and clamp these scraps to the both rails, keeping them vertical, then Ill use my router sled to slide across the rails. I won’t show how I made it, there’s a tone of them out here, just search YouTube for it. And now that I have one flat surface, Ill run it through my planer. Now I have fix the sides that aren’t level, or straight, again I don’t have a jointer, but I do have a long level. Ill place the board agains the level, and ill slide the level against the fence. This makes a straight cut. OH, this only works if the board is shorter than the level. So this is one of the more challenging parts of the build. Im Excited because Ill be using my router, and I’m nervous because Ill be using my router. So I start the cut, and watch what happens raaaaaaight here! Well I carried on and finished, and to be honest I’m pretty happy with the way it turned out, but what I wasn’t happy with, was the amount of tear-out I had from this cut. And after looking at it, and the rotation of the bit, and the direction of the grain, I can see that its going to tear bits out of wood. And I thought, what If I place a piece of wood before that cut, It should protect it from tear out, just like I noticed it did here. Well, armed with a bit of knowledge, and another brace to do, Ill try again, but this time with a piece of wood, before the cut. Well I think that looks better, and there’s no tear-out. If anyone’s wondering why I made these braces out of two 2X4’s instead of a 2X6, its because I didn’t have a bit that was long enough to drill these pilot holes. Now ill drill the holes in the braces for the iron pipe to slide through. They don’t need to be as accurate as the holes in the shelf itself. And now that their done, I’ll fasten this brace, and this brace as parallel as I can, so the shelf can rotate freely. And I might as well check for level. Just so you know, I screwed those two sheets of plywood together, so when I actually cut the top of the shelf out, they’ll both be exactly the same size. Now that the top is done, I can get to work on the shelf itself. Ugh, I’ve been at this for a while, and I’m hungry, ah, it’s lunch time! I didn’t leave that there. Interesting Hmmm… Well, now that lunchtime is over, I need to find a location and pre drill holes for four threaded rods. You’ll see what these rods do later. I’ll just pre drill And countersink so I can fasten these two sheets of plywood together with screws later on. So now we have our four threaded rods. My next challenge was how am I going to secure them in this sheet of wood. And I really struggled with this, until one night, where I had a dream. I think I heard waves. I dream’t I was walking on a beach, and my feet looked pretty weird and then I think came upon this large rock. And on this rock, was my shelf, with four threaded rods in it and it look like they were in there pretty good! Well in the morning when I woke up I knew exactly what I needed to do. Well after coffee I got back to work. And what I realized is I was thinking of this top as one solid piece of wood. But in reality its just two pieces screwed together and that’s when I realized I could hide a bolt and washer inside one of those sheets of plywood. Now that I know how to secure the threaded, I can get to work and turn this shelf into something that real. You know I’m nervous. I’ve been looking forward to placing this shelf for a long time and I’m hoping there’s no surprises. Hold on I forgot something, these screws. They’ll help level the table. Ok, Lets try this again. Ah I might able to place this better without that shelf in here and some help from this guy. My Dad. Now I know this thing is going in. Victory, that was short lived because I forgot these! Washers, they’ll help keep the shelf in place. Well now that the shelf is placed, its time to work on the iron pipe. It took a bit of effort to cut all the way through, but I was determined to make it happen. By widening these holes on the flange, it will provide more room for adjustment when I install them later on. And I’m starting to get pretty nervous about now, because were going to try and rotate this shelf for the first time. And I’m hoping it goes smoothly. Ok lets give it a try. Wow fits nice eh? Woo! Bring it back up again check to see how it fits again, beautiful! Wow very nice. My Dad is my inspiration, as a kid I loved messing about in his workshop, and he’s now here messing about in mine. I don’t get to see him or my amazing mom as often as I’d like, and todays a sad day cuz they’ll be returning home. And I’m already looking forward to our next visit together. The screws that I’m adjusting now towards the outside of the bench help level the shelf it its open position. And the screws that I’m adjusting now towards the inside of the bench help level the shelf In its stowed position. Ill install some latches now, to keep the shelf in place but most latches are quite loose. I wanted a latch with little to no movement so I ordered a bunch of them and I found this one. It was the tightest of them all. I used a marker on the end of the pin, then pressed it against the shelf, now I’ll know where to drill, then I made jig with some clamps and a piece of wood, to align with the mark, and help drill a hole at 90 degrees with a little help from Anna, she’s my better half. Is That Good? That Looks good 🙂 And this part was enjoyable, levelling my miter saw with a straight edge and single playing card. I think now is a good time to put my table saw back because there’s just a couple more things to do. One is to install this face plate, onto the front of the shelf. And cut some miter slots. Well I hope you enjoyed my workbench journey with me, If you have any questions or comments please let me know, and if you’re interested in building something like my workbench bench, Ill have the plans available, just check for them in the description below If you like what you see, please subscribe, hit the like button and thanks a lot for watching. …
“+10,000 Step By Step Plans …even if you don’t have a large workshop or expensive tools!“ Yes, Get Access To 12,000 Shed Plans! 👈