best woodworking bench
“+10,000 Step By Step Plans …even if you don’t have a large workshop or expensive tools!“ Download Today! 👈
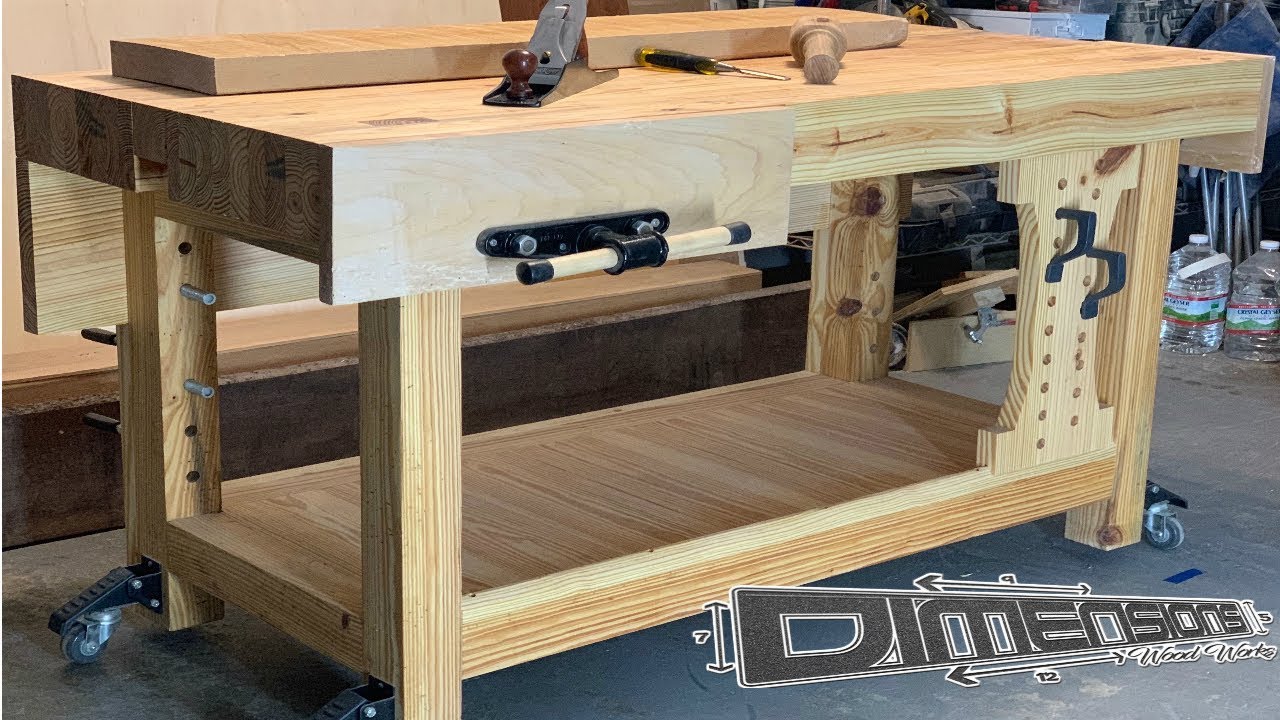
hey I’m JD and welcome back to the dimensions Woodworks woodshop today we’re gonna be taking a look at how I built my Robo slash Nicholson style hand tool woodworking workbench let’s get started this video is brought to you by wood craft helping you make wood work since 1928 since I started my bench build with all rough cut lumber I just start to break it down into a little bit more manageable size pieces so that the milling process goes a little bit faster [Music] [Music] the thickness planer is and always has been one of my very favorite woodworking tools you put in a rough gnarled piece of lumber and it comes out looking fresh shiny and new like you just bought it from the Home Center [Music] [Music] now we’re just going to take off that other edge since we have a perfectly flat reference edge to run along the fence at the table saw and square this board up to ensure we have to square flat edges then it’s time to begin the lamination of the work bench top laminating this boards and this manner gives us a really nice thick sturdy work bench top so that it can take a lot of abuse over the years [Music] after the glue has had time to set and pure overnight I go ahead and make a pass through the planer with each half of the workbench I did this intentionally so that the width would still fit through my thickness planer and I wouldn’t have to do all of this work buying it there were however a few areas that I had to do slight touch-up on with the hand planes but that’s okay as long as I didn’t have to do the entirety of the flattening after the glue up all with hand planes and I saved myself some time and as you see here there was still quite a bit of flattening done with the number seven and the number five and a half just to make sure that we had a really nice well tuned surface then I took each half of the work bench top back to the jointer just to make sure that we did have a really good square flat edge they do tend to warp a little bit and change especially since I was working with rough cut lumber it may not have let go of all its moisture yet now that we know we have a good square edge we can take off the extra length that I left just for a little bit of margin of error on the work bench top [Music] now we can begin preparing the boards for the base as I said I started with all rough cut lumber so I had to make sure I got everything nice and square before beginning construction of the base I chose to use four by fours rather than laminating other two by sixes so there would be one solid piece to construct the legs row then to join the two halves of the worktop I used 14.4 block and Dow joinery to make those two massive halves of the workbench come together these dowel kits are great and I’ve used them quite a bit you just drill your holes into your initial piece then it has a divot that goes in the backside that will leave marks to give you your center point as to where you need to drill your opposing hole the Dowling kids usually come with a few dolls but I typically just buy an oak doubt the same size as the drill bit and then I make them a little bit skinnier and round off the edges so that they slide into the holes with ease [Music] now I can begin the layout for all of the mortise and tenon joints that will bring together the base [Music] I always like to mark the negative waste space so I don’t accidentally make the wrong cuts I find that using combination squares and tools like the Craig multi mark give me a much more accurate layout than just using a tape measure then it was time to start the measurement of the through Tenon’s that would join the base to the top I measured the thickness at the top to transfer that measurement plus a little bit extra just so that the top of the tenant’s protrude so we have enough room to cut them off and flush them up later [Music] now that all the Tenon’s are cut it’s time to turn our attention to all the mortises I start by hogging out the bulk of the material with a spiral up cut bit at my router then I finished the cuts with the chisel to really fine-tune those joints [Music] I’ve also found that it is much easier to round over the edge of the tenon than to square up the edge of the mortise it only takes a second and it makes for a really nice sliding fit to fit that tenon right into the joint I make sure to check all of my joints Foursquare along the way so that we don’t end up with the entire leg assembly out of square after the dry fit of the two individual leg assemblies looks good we then turn our attention to the two long stretchers that will join the two halves of the base I make sure to apply glue to both the mortise and the tenon because the end grain in the tenon is really going to soak this glue up and we want to make sure we have a good strong lasting joy now I had to get a little creative here in order to glue the long stretchers in because I didn’t have clamps long enough to span that distance so basically I just made a set of calls for each leg and then clamped against the call to pull the joint tight [Music] you can see that this method worked well and it just goes to show that necessity is the mother of invention now that the base and the workbench top are both completed independently it’s time to lay out these huge through mortises for these massive Tenon’s so that we can join the top and the base to one another I used the actual base in this process rather than measurement just to make sure there were no discrepancies then I hugged out the bulk of the material from the bottom side with the same spiral up cut bit in the router then flipped it over marked the top and did the same from the top because the plunge depth of my router was only two inches and the workbench top is five inches thick I had to finish the cut with a Forstner bit and then come back and really tune that mortise up by hand with chisels this is the one set of mortise and Tenon’s in this entire build that you really want to take the time and pay special attention to because it will be seen in the finished product [Music] once I got the joints really close with the chisel I took a scrap piece of wood with some adhesive back sandpaper and really tune the joint in then I took my block plane and chamfered the edges of the tops of the Tenon’s because the top has a lot of mass to it and I didn’t want those boards to crack whenever I joined the top to the base and because my work bench top weighs in right at 200 pounds I chose not to even glue this joint so that one day if I do have to move this bench in the future I have the option of taking it off now we have to find some kind of way to fill that void in the middle of the split top I saw this gap stop design from Shanon Rogers at the Renaissance woodworker and it came from an old Nicholson style bench it basically has a pyramid cut so when you shift it to one direction it makes the gap stop sit proud 1/2 inch and when you push it to the other direction it sits proud an inch and a half so you can work quickly and easily with different sized stop [Music] then I break out my number seven playing and make sure that the gap stop is perfectly flush with the rest of the bench top [Music] now I grab my Japanese pull saw and flush up the tops of the through tenants for the bottom shelf I just rabbeted a small lip on the inside at the bottom of the base and lined it with one biomaterial now it’s time to start measuring out for the chops for my vices this is a piece of maple that I had that I used for my front and my tail bites [Music] if you want to see the full process for these Wood River vices to be installed I’ll have a separate video which I will put a card to here [Music] then just a couple of passes with from number five to sure up at the tops of the vise chops with the top of the bench [Music] now it’s time to begin construction for the sliding Deadman that will go on the move our side of the bench this is another portion of the bench build that I think could use a lot more detail so I’m gonna do another video on just doing the sliding dead man as well [Music] [Music] now to test out how well the vise and the sliding Deadman work together I just put a longer board in there and secure one side with the holdfast at the Deadman and tighten up the other side with the vise and this thing is not going anywhere now because the weight of this bench is now substantial and just the top weighs 200 pounds one of the ability to make it mobile so these would river workbench casters were the perfect option for a bench that’s now well over 300 pounds it glides pretty effortlessly across the shop but when the casters are disengaged that is secure and stable I then enlisted some help from my neighbor to set the bench over on its side to continue to work on the Nicholson side of the bench I used a 1 by 12 for the main apron and then two by fours to basically just make the entire side of the bench one flush area then I use my Center punch to mark out the location for all of my dog holes and began drilling with my miles crap drilling guide this thing works really well when you can’t bring the project to the drill press you bring the drill press through the project the thickness of the legs in order to be able to draw all the way through required me to add an extension to my drill bit so that I could meet that thickness I set the plunge depth of my drill so that the bottom of the spade bit just hooked through then came back and finished the hole from the underside to avoid Tara now it was just time for a little final hand sanding so that we can apply the hand rub oil Danish oil has been my go-to finish for a nice natural look for a really long time it’s extremely easy to apply and it’s also very easy to maintain it really makes the grain pop and brings out the natural beauty in the southern yellow pine [Music] you [Music] thanks so much for watching y’all I really do appreciate it and another big shout-out to woodcraft for supplying all the vices and accessories used in today’s build if you want to check out those products thanks to be down in the description and I also put a link to a downloadable set of plans and until next time don’t forget to get better every day you …
“+10,000 Step By Step Plans …even if you don’t have a large workshop or expensive tools!“ Yes, Get Access To 12,000 Shed Plans! 👈