wood working bench plans
“+10,000 Step By Step Plans …even if you don’t have a large workshop or expensive tools!“ Yes, Get Access To 12,000 shed Plans! 👈
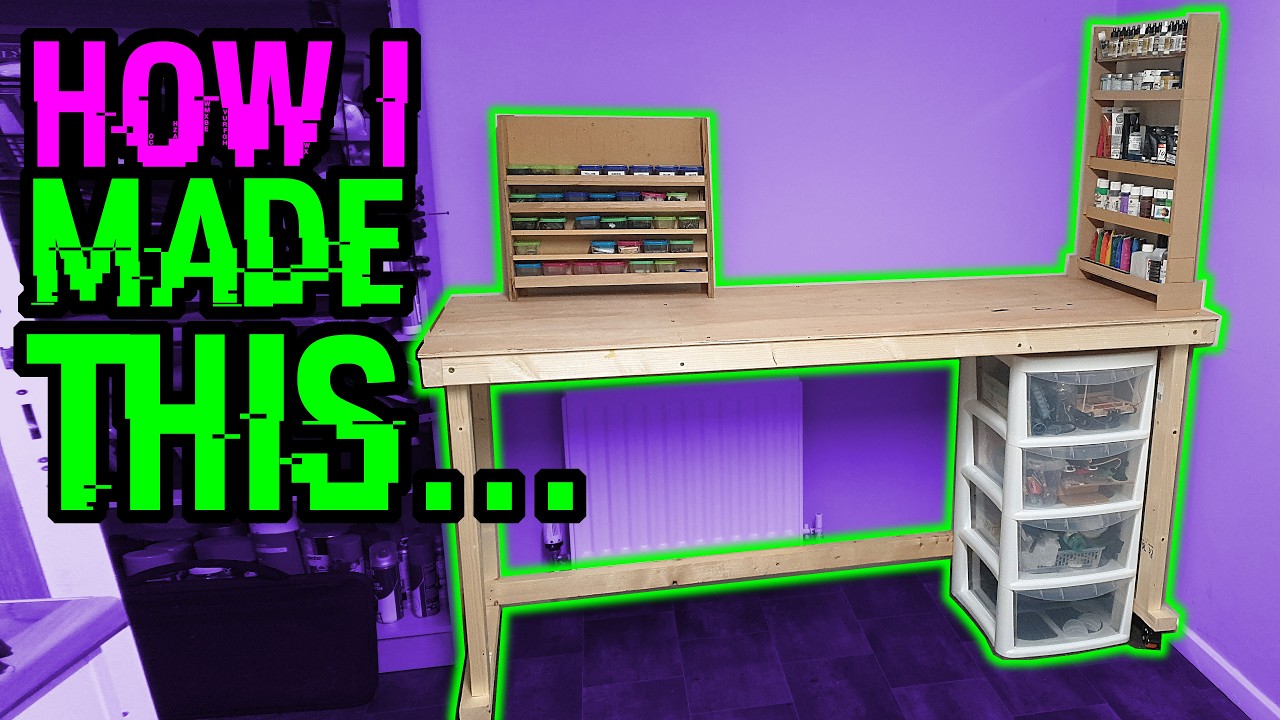
whether you build models professionally or just as a hobby one thing all model makers need is some kind of workspace and I am no different in this video I show you how I built my brand new workbench and also discuss some other things about the channel greetings fellow earthlings welcome back to Darling B sci-fi builds now if you’re a regular viewer to the channel you’ll probably recognize two things firstly I’ve not posted a video in around about 6 months and secondly you probably won’t recognize what’s going on behind me and I’m going to explain all of that in a moment but first I want to talk about my new workbench when it came to building a new workbench my idea was initially to go down the hole build it as cheaply as possible route I’ll be honest it’s my usual go-to method for doing anything having visited my local in Q store here in the UK my first Port of Call was the offcuts bin I was pleasantly surprised to find a good range of wood available plenty of potential wood that I could use the best thing about offcuts bin is that all you need to do is make a small donation to a local charity and you can pretty much take as little or as much wood as you like looking through the offcut bin I managed to Source some fairly heavy duty looking off cuts which I initially thought would make really good legs and Str struts for the bottom of the bench my luck was in as there were several pieces all of very similar sizes it might not have been perfect but considering it was all pretty much free I can’t exactly complain as well as long pieces of wood I also had a collection of sheet material as well which I planned on using for the top of the workbench my plan was fairly simple all I wanted to do was create a basic frame which would include the legs and a Cross Beam which would support the weight of the worktop I had previously worked out the height that I wanted the worktop to be so I started measuring both the width and the length of all the wood pieces so that I could cut them to sides and create a frame where the worktop would be at the right height as I didn’t have any access to any power tools I took all of the wood to my local hack bace and use some of the equipment there in an Ideal World my preference would have been to use a miter or chop saw to Crosscut the pieces I was going to use for the legs unfortunately there wasn’t one at the hack Bas I could use at the time so I decided to use the table saw and the Crosscut sled instead whilst it wasn’t an ideal solution it certainly did the job as the table legs were very very thick and I could only raise the the blade so high I had to do it in several passes and don’t worry I was very careful to keep my hands well away from the blade even though it doesn’t look it [Music] here as the legs were made up of individual strips rather than one piece of wood I added some additional support with some extra screws to hold it all together it was then time to repeat the process with the sheet materials cutting them to the width of the workbench ideally a larger table saw would have come in handy here but I still managed to get the job done now if you are doing any DIY or decorating or woodworking anything that is going to get you messy then I highly recommend do not wear your Sunday best clothes so with that in mind I’ve just put on some cover old old clothes that I do not mind if they get messy I’ve used them for decorating I’ve used them for painting and if they get cover in sawdust or paint or grease it doesn’t really matter once all of the wood was cut down to length and the Sheets Were trimmed down to the width of the worktop I carefully arranged a wood to create a mockup of what the worktop would look like when it was finally assembled carefully I tried it out and was fairly happy with how it looked it was an ideal working height when I sat in a [Music] chair feeling quite happy with the progress so far it wasn’t until I got home that I’d realized I’d made a bit of an error in my plans the problem was that in the kitchen area where I had planned to set up my new worktop I actually had a radiator on the back wall which I hadn’t accounted for the problem wasn’t that the worktop wasn’t high enough to avoid the radiator the issue was that I often use the radiator and I wanted to make sure that I had a big enough Gap above the radiator to allow for the heat I felt that if the radiator was on while I had the desk right on top of it then this could cause problems further down the line the solution involved yet another trip to B and Q however this time rather than trying to find off Cuts in the offcuts bin I actually decided to buy some wood instead if I’m totally honest I must admit I was never particularly happy creating a workbench using the offcuts I had I wanted to make something that looked a little bit nicer as it would be set up in the kitchen and would be on display rather than in a shed hidden away where nobody would see it I also felt that if I built it properly using quality materials it would probably last a lot longer and appear more presentable when it appears in videos on the channel a bit like my puppy [Music] Toby when it came to constructing the new workbench I started off by mocking up a workbench in my back Garden ironically using the offcuts that I’d used for the first version of the worktop [Music] unlike before I actually managed to borrow a mitur from a friend of mine so I could cut the wood to length cheers Michael thanks for the saw appreciate it I then started to measure the strips of 2×4 to create a frame underneath the new workbench it was then time to start cutting the wood to sides starting with the cross [Music] races after making a few cuts the blade on the saw actually came loose although it wasn’t a safety concern not going to lie I got very worried for a few seconds once I had changed my Underpants and retightened the blade I then finished cutting the cross braces before cutting the two longer pieces for the front and back of the workbench it was then time to start assembling the frame that would go underneath the plywood checking that everything fit guess what [Music] remember folks measure twice and cut once what do you think of my measurements fortunately the wood that I’d cut was actually too long so I could still cut it back down unfortunately main issue I’ve got is it’s currently 900 p.m. and it’s a bit too late to use the uh electric saw because of the noise I’ve got Nathan a 5-year-old upstairs in bed there’s kids surrounding this area they’re probably all in bed maybe some babies and I think it’s a little bit late to make too much noise for the sake of two cuts have to do it in the morning however just at this point my neighbor started strimming their Garden so I thought well I’m not going to be any noisier than that and I went for it well if you can’t beat him join [Music] them after trimming the long pieces down I then started to assemble the frame which would support the top of the workbench making sure that it was all aligned before I started to screw anything together I first dry fitted the frame in place once I was happy it was then time to start screwing the outside of the frame together I created pilot holes before I screwed anything into place to prevent the wood from splitting once I finished this I then checked that everything was straight by measuring corner to [Music] corner using some spare off cuts for measurements I added the cross braces to the frame in equal distances from the edges screwing them all into place as I [Music] went the next stop was to screw the work top down onto the frame I laid the frame down flat before placing the plywood on top making sure everything was squared and aligned again I created pilot holes for the screws as well as counter syn holes so screws went in flat against the top of the surface of the workbench I followed the same process for screwing the plywood down into the center braces using pilot holes counter sinks and end screws once the top of the work bench was completed the next step was to build the legs and the cross braces to support them I had decided that cross braces were to be attached under the legs so set about cutting all of the pieces to sides using the worktop as a reference to the size I then set up the legs exactly how they would appear under the desk to make it easier to install the leg I first attached the cross braces to the uprights using a couple of screws per [Music] leg it was then time to drill pilot holes into the frame counter sync the holes and Bolt the legs on once the legs were finally attached I then turned the desk back over with help from my girlfriend Sarah thanks bed and put it in place making sure that it fit into the Gap I was planning on using it was spoton the length was ideal and it was enough height to clear the radiator it also included space for storage underneath as well as on top of the desk absolutely perfect once I had finally checked that the bench was going to fit it was then time to install some cross braces to help support the legs and keep them upright I flipped the bench back onto its side before adding a long cross brace between the two legs running along the length of the bench one last thing I wanted to do was add casters to the bench so I could easily move it if I needed to that’s pretty solid with that I found a set online which were extremely good value for money the pack was absolutely brilliant and contained absolutely everything I needed including all four [Music] casters all the screws and washers a screwdriver and even a pair of gloves to prevent everything getting [Music] dirty all four of the casters were fitted with a break as well and according to the instructions which I didn’t read each Caster could could hold up to 150 lb in weight before I installed them on the bench I quickly did a test fit using a scrap piece of wood and found that Not only was it incredibly easy to install but it felt very fluid when I was moving [Music] around I first placed the casters on the underneath of the desk right below where the legs were and the spot where I needed to drill the holes it was then just a case of drilling four holes per [Music] caster and then using the screws and washes supplied I simply screwed the Caster into the bottom of the [Music] workbench now I’ll be honest I didn’t use the provided screwdriver however I’m sure it would have worked just as well [Music] I then repeated the process with the other free casters and the bench was ready to roll out quite [Music] literally now be honest not only am I very impressed with these casters they were very easy to fit very very uh good value for money and also the packaging and what you got with it was absolutely brilliant must admit I’m very impressed with them and I would highly recommend them especially if you are looking to add kind of Wheels to any kind of piece of furniture now what I will do is I will set up a Amazon affiliate Link in I will leave it in the description down below if you do want to buy the casters then please use the link check out so the question is why have I got a new workbench what happened to the old one why am I not still in the shed and why have I not posted Ed any videos for the last 6 months and the answer to all of that is basically down to the fact that I’ve recently moved and so unfortunately my videos have had to take a back seat now that’s not to say that I have abandoned the channel at all because I have decided to set up a proper dedicated space that I can use for working on all of my science fiction based models and filming them here for the channel and I’ll be honest the urge to get back into there is very strong right now as you can imagine especially with all the paint and all these bits behind me which I’ll discuss in a later video I am going to be obviously working on the projects that I have not yet completed uh for example the airlock door diarama there is still some work to do for it unfortunately there’s also some repairs to do for it it got a bit broken in storage and also I will be continuing my ET ATV I’ve also got a load of other projects that I have basically wanted to start and I’ll be working on them obviously now I’ve got a bit of space so don’t give up with the channel I am still going to be doing a lots of projects so make sure you hit the like button and subscribe as well as moving I’ve also been doing some work behind the scenes creating a series of 3D assets or greeblies that can be purchased and downloaded so you can use them on all of your science fiction related projects I currently have over 60 individual GS available which I have put into fre packs Square panels rectangular panels and circular panels or buttons each pack contains an assortment of Assets in different formats so you can edit them and then either 3D print them for physical models or import them into a 3D package and use them as digital assets as well and you can use them for personal or commercial projects each asset pack is available separately however if you want access to all of the assets you can purchase the bumper value box containing every asset in all three [Music] packs all of these asset packs are available through my buy me a coffee page the link is down in the description below but wait there’s more if you want to save money on these asset packs then sign up to become a member on my page as well not only will you get early access to any new videos I post on this channel but you’ll also get behind the scenes images and other information as well on top of that all of my members get discounts on any items that I sell in my buy me a coffee page shop if you don’t want to become a member that’s fine you can simply make a donation and all donations are very much appreciated and help towards materials equipment and tools that I Ed to create projects for this channel so after you watch this video check out the link in the description and help support the channel cheers so now that I’ve brought you up to speed please just keep an eye out for some more videos obviously I have just recently posted a finding gbl’s video on the channel as well uh in the meantime there are quite a few playlists I have started check them out and in the meantime as still AA I’ll be back …
“+10,000 Step By Step Plans …even if you don’t have a large workshop or expensive tools!“ Yes, Get Access To 12,000 Shed Plans! 👈