garage workbench plans
“+10,000 Step By Step Plans …even if you don’t have a large workshop or expensive tools!“ Yes, Get Access To 12,000 shed Plans! 👈
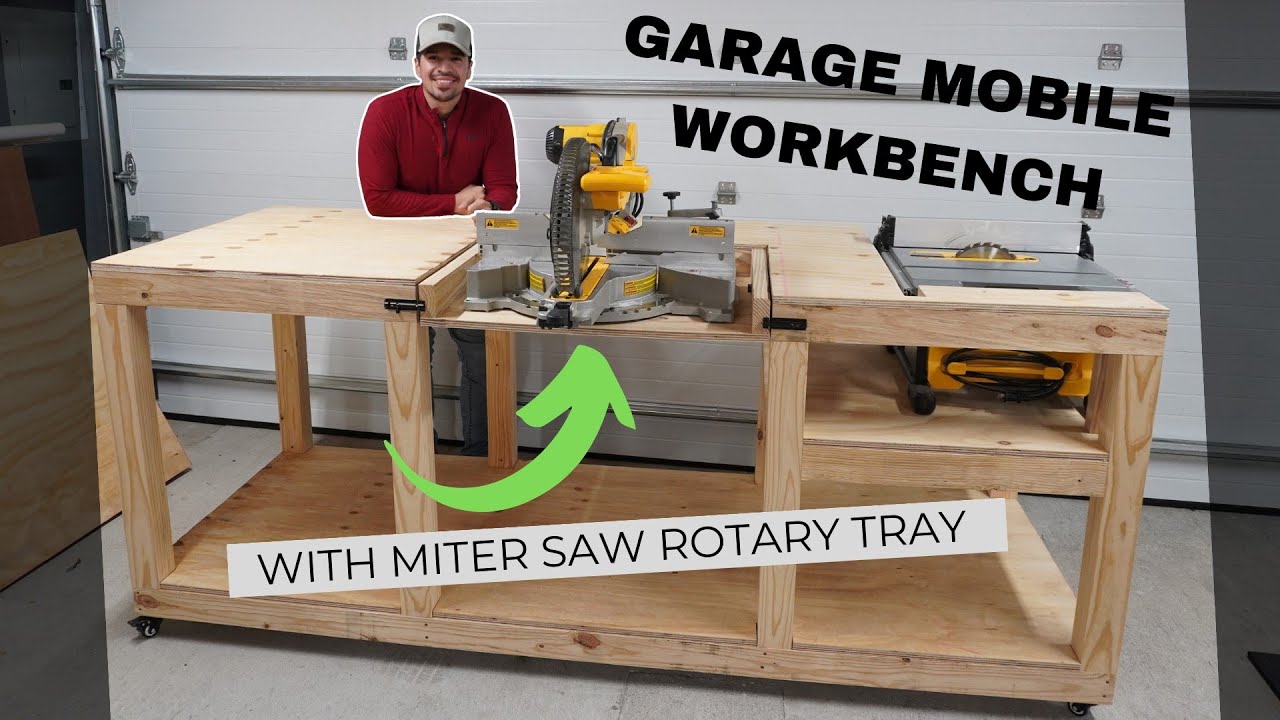
okay guys so in this video I am going to show you how I took this setup and I’m turning it into this now I’m going to walk you through how I actually built my mobile workbench utilizing some two by fours three quarter inch plywood and some miscellaneous accessories for the miter saw section um but without getting too far ahead of myself let’s take it back to the beginning let’s go so yes that’s the plan for today today we’re going to build a mobile workbench for my miter saw and my table saw I’ve been working on this this folding table uh lifetime folding table for the last year I should say and it’s been great but I mean I think it’s time for an upgrade since we have some future projects coming up at the house this will be my primary workbench and so I’m going to wheel it out the garage and move it to that side move it back to this side so it’ll be great use and so I’m going to walk you through the steps of how I actually build a mobile workbench starting from the ground up so that’s the plan for today so let’s get to it let’s go [Music] gotta have your morning coffee have to have your morning coffee it’ll get me through this 10 times faster I promise you okay guys so here’s my lumber I got number two uh Southern yellow pine studs from local hardware store I’m estimating about 20 pieces that I’m going to need maybe a little bit less than that but I bought some extra ones just in case and I have some three-quarter inch plywood for the top and bottom pieces and then I’ll cut out some miscellaneous pieces for some storage at a future time but yeah that’s the that’s the material I got and then I’m going to show you guys over here some of the casters and some of the accessories that I’m going to use to put it all together so here’s some of the miscellaneous materials that I’m going to need to put it together right so you have the feet these are the casters that I’ll have on the actual workbench so these are from Amazon I’ll put the link down in the description below which ones I bought these have a 150 pound force on each Caster so all four together that’s 600 pounds which is more than enough for this mobile workbench I may add two additional ones down the middle um but that’ll probably be at a future time so then I have some block uh devices here for the actual miter saw section these are just going to get screwed on the ends and you’ll see it as I walk you through the build how are these gonna how these are going to come into play then I got some lag bolts as well actually not valuables these are um symmetric type bolts for the actual miter saw to go up and down as I build it so that’s these and then you got your screws your multi-purpose Ark Fasteners um these are three and an eighth these are for pretty much the ends and then I’ll also use these um for the double done location so I got two and a half and three underneath I got a bigger box here um because I’m going to use these ahead of future time as well so you don’t have to get this much you can get a smaller one just like this one so three and eighths inch as a workout just fine these are number nine if I were doing something structurally related then I would probably get a number 10 but number nine is just fine for what this project okay guys so Step One is I’m working on the legs um the frame the base frame so to do that I’m going to go ahead and trim an eighth inch off the edges that way it has a nice reveal around all four corners and there’s not going to be any round edges it’s going to look nice and pretty so that’s step one let’s get to that [Music] okay guys so what I did there is I just cut one side first and so now I’m going to go ahead and cut the other side [Music] it’s probably the most time consuming part as far as getting the materials prepped for for the build but for the most part it’s it’s worth it if you you don’t have to do this step this is something that can be avoided you can just put it all together and not have to worry about the round edges so that’s just something to keep in mind when you’re putting the build together so anyways let’s keep going [Music] okay so now what we’re going to start doing is cutting all the pieces together so first I’m going to lay down the base uh the base is going to be three feet by eight feet and I was gonna do it a full size sheet but you know given the room that I have and some of the other things I want to do in the future I figure three feet is more practical for me so um that’s the size that I’m gonna go with so to do that I’m going to start cutting all the intermediate pieces and those are going to be at two foot nine but I may need to grow it a little bit in size simply because I started to trim off a little bit of the um top and bottom pieces with the planer so maybe like two foot nine and a quarter so we’ll go with that size and then we’ll start cutting all those pieces and then we’ll lay the base screw it in and then we’ll start working our way up so let’s get going on that [Music] okay so this is where I’m using the um three and an eighth inch screw jrk screw on the ends and so that’s just important to get more bite so that’s the that’s what we’re doing right now putting together with those screws [Music] okay so the next step I’m going to do is build the posts up um and so that Dimension is going to vary depending on the wheels that you select and the top piece of plywood you selected um so my elevation I want that to be at three foot four therefore I gotta take into consideration the wheel or the caster and then also the plywood which is three quarters of an inch that’s going to be three foot four or forty inches 40 inches minus three quarters of an inch minus two inches and 5 8 that gives me three foot five eighths right so my pieces on the corners need to be at three foot and five eighths of an inch so that I can be at 40 inches at the top for my working platform elevation and so that’s that’s critical that you measure that and you take into consideration those other parts um so now that I got that Dimension let’s start cutting those pieces and then start putting them in the corners [Music] okay so this piece here is going to get attached on the inside corner but I have Notch here and here so that I can bypass this piece of stud right here so that’s going to be the next step and then we’ll start doing that to all four corners and then we’ll put an out outside face piece um on the outside to give it a flush look so that’s the next step we’re going to cut all four corners start putting together from the inside and then we’ll attach the other piece on the outside and then put a plywood piece and then build it up let’s go [Music] [Music] oh [Music] okay so now what I’m doing is I’m measuring these intermediate pieces that go easy before I put them together I need to make sure that I have my width of my miter saw in this in this bank right because this is where it’s going to go so I just need to make sure that the support piece coming up is attaching to this so this has to be reading uh right in point I got the dimension from there it’s two foot nine minimum okay guys now what I’m doing is I’m uh I’m cutting an inside piece I have to say the outside piece um you can kind of see these are all prepped now for all the the posts that come up but then what I’m doing is as I’m putting it here I need to come back and fill it with one more piece on the outside and so that will look like this I’m just adding another 2×4 on the outside and then that’s gonna look nice and plush and pretty like that when I cut the piece when I cut this piece I will then take it through the planer to smoothen out the edges on both sides and then it gives it a nice finish just like that I’ll walk you through one of them and then we’ll start putting the rest of it together [Music] okay guys so now I’m going to put these two pieces together um you put a little bit of glue on it just to give it some more bite put this sucker on top just like that one thing that I am doing I’m hiding the screws on this face and I’m putting them on the back side so in this instance I’m gonna go ahead and make sure that the screws them back here that way they’re not exposing the front face [Applause] [Music] now let’s go run it through the planer [Music] okay so now I’m putting it together now to put it together I’m using two and a half inch screws going this way and then a three and an eighth inch screw going that way that way it’s 30 both ways so this is this is a little post now let’s let’s snap that stuff around [Music] thank you so the framing on the bottom section is at least complete for now um The Next Step I’m going to do is I’m going to get my piece of three quarter inch plywood and I’m going to cut it to size for this and I’m going to notch around these posts the reason I’m doing that now is because if I do it after it’s all framed and complete I’m not going to be able to get a full piece installed unless I’ve finagle it somehow and get it in some way or another but I feel like this is the easiest part to do this and so that’s what I’m going to do next and so measuring it notching around this and then sliding it to the top that way it’s easier and then I’ll just screw it in with some Brad notes and then that’s the next step so let’s keep it going foreign [Music] tired of doing this a couple more pieces to do and then I’ll do it on the [Music] okay so I have my piece of plywood cut now what I’m going to do is essentially just make marks on corners and then the inside areas where the middle posts are excuse me just made a template you know you can just put it on the ground and then just Mark around and then you would use your jigsaw to just put around those uh those locations so let’s do that let’s mark these and then we’ll cut it and then we’ll put it in place [Music] foreign [Music] to installing an electric measure from end to end on each one just to make sure I’m not going to have any difficulty when I actually install it so that’s the that’s the next step you know just kind of make sure that your we call it as building right like reviewing your openings before you actually install the product in place so that’s the next step let’s go do that [Music] thank you [Music] just like that now let’s keep it going okay so now what I’m gonna do brad nailer all along the ends and then also some middle supports for this one I’m actually using two and a half inch brad nails um that’ll give it enough bite all the way around so but we’re doing that [Music] so now what I’m going to do is frame the top piece and also the intermediate piece where my table saw is going to go so I’ll do that next and then put a piece of plywood and then we’ll put a piece of plot on the top and then we’ll start working on the miter saw section but first things first we got to measure the depth of the table saw figure out how high and low it needs to come and then we’ll frame those pieces out and then we’ll frame this top section off and then keep going that way okay guys so I went over there and measured my miter saw height and um it’s 12 and 7 8. so what that means is with my plywood piece on top the bottom piece over here to support that area I need to make sure that this distance from the top of plywood here to the top of plywood up here is 12 and 7 8. three quarters and then 12 and 7 8. and then three quarters from there is going to be my my plywood my stud so pretty much from there to there it’s gonna be 12 and 70s as well as well okay guys so I’m gonna work on the platform for the table saw uh but to do that I’m gonna cut some pocket holes in this backboard and screw it in from the back side so let me use my Kreg Jig to cut to cut to pocket holes we’ll uh [Music] thank you [Music] [Applause] [Music] okay guys so the whole base is complete for the for the table saw so now I’m going to cut a piece of plywood to go ahead and put it here in this section and then we’ll continue building up and then uh frame the pulp perimeter but let’s keep it going [Music] all right guys so now what I’m gonna do is my tabletop looks pretty good um still got to put the plywood here but the next thing I’m going to do is when this is properly um you know set in place whenever I’m going to use it I need a notch right here for that reason right there up front is fine but back here I need to make a little Notch for this it’s a sliding real quick so that’s the next step we’ll cut this we’ll cut that size and then we’ll keep framing around it let’s go okay guys there you have it the framing at least for the actual workbench itself The Notches here are obviously like I mentioned earlier that’s four um the table saw and then we’ll cut this piece after the fact um I need to play with this a little bit more just to make sure that I actually have the right dimensions for the miter saw and then place the plywood piece on top cut this section and then on to the next phase baby let’s go [Music] foreign [Music] table saw opening and also the um the table saw slider or the guy to go ahead and prep it for this and then I’ll do the same thing for the actual miter saw in the middle so let’s get going with that okay so all my locations are marked I need to be delicate with this one that one’s okay I can kind of cut a couple holes to to make sure it pops out as smooth as possible so let’s go ahead and do that [Music] thank you [Music] hey guys so the cutting is now complete as far as this phase goes uh table saw section is done that’s where it’s going to go now what I’m going to work on is the the miter saw section and now this is the piece I cut from this area and I want to make sure that it looks like that whenever um I’m using the table saw and so to start off I have to start it off like this that way when it comes up it just looks like it’s part of a original uh four by eight sheet that’s what I’m going to do now let’s get to that part so to start off I’m going to work on the base first and these pieces are going to go like this on the ends and then the miter saw is going to go in here and so when I’m done using it I’m just going to flip it and then the top piece should be flush with this but before I do anything and prep these I need to make sure these are at the correct depth from base of this to top of a workbench elevation and so the miter saw death is three and a half inches so I have to make sure this here is three and a half inches from here to the top of this okay guys so the piece is now cut and ready to be installed with uh so what I’m using is a couple of these bolts that I got from the local hardware store and I’m essentially going to pass them through and that’ll be the swivel point for the table and so to simplify it I did a little mock-up here to kind of show more or less the intent so this is going to be the end result so when I’m using the miter saw there’s gonna have to be a little bit of a lip there because of the difference I need at least three and a half inches for this to work um when I’m using the miter saw using it in this configuration with table saw I’ll just turn it back around and it should just be flush like that so I only have one chance to do this I don’t want to have to cut multiple holes and so I mocked it up so I can actually see how much of a depth I actually need to go down on the 2×4 and then obviously I already have my Center Line marked of how far I need to go this way let’s start prepping it for installation I got to lower this down quarter of an inch and then we’ll we’ll cut the holes through and then we’ll go to the next step and see if it actually works out [Music] foreign [Music] so there it is it looks like it fits just fine Gap wise I’m not too concerned about the Gap now I’m gonna put some of the washers through it and not as well and then we’ll tighten it down a little bit and then we’ll put the lock device in but there it is that’s the step on getting the elevation established and also making sure that it’s flush on this side when you’re using the table saw so there you go let’s keep it going okay guys so my little locking pins are in whenever I’m using the miter saw I kind of want it’s a balance over here as well so I’m going to get another one of these and then obviously turn around and then I’ll lock it away there you go that’s the that’s the end goal right there now I’m gonna put the wheels on and then I’m gonna put the equipment on and let’s let’s take a look when it’s all said and done let’s keep it going [Music] but there you have it guys this is the look whenever I’m not actually using the miter saw it’s simply just a table saw um but anyways that’s it for this one hopefully you guys find this video helpful um I’ll be working on some more DIY projects and definitely going to be putting this to Great use but if you guys find this video helpful go ahead and click that like button subscribe to the channel I’ll definitely be posting out some new content every time I have a new project here at the house hopefully you guys enjoyed this one we’ll catch you on the next one [Music] thank you [Music] …
“+10,000 Step By Step Plans …even if you don’t have a large workshop or expensive tools!“ Yes, Get Access To 12,000 Shed Plans! 👈