carpentry gifts
“+10,000 Step By Step Plans …even if you don’t have a large workshop or expensive tools!“ Yes, Get Access To 12,000 shed Plans! 👈
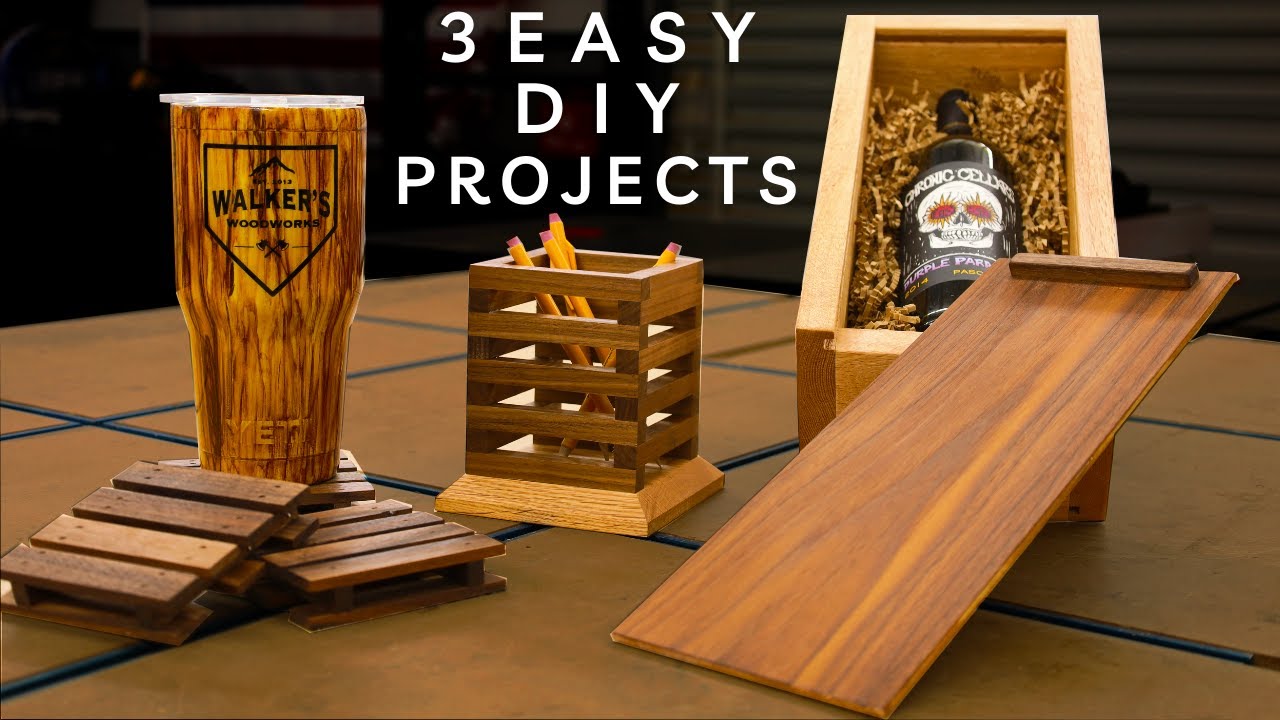
what’s going on guys i’m brandon from walker’s woodworks welcome back to the channel today i’m going to be showing you how to do three quick projects in the shop you can give away as gifts or sell the first project on the list is going to be a combination of two things that take me back to my roots pallets and coasters i figured it might be cool to make some coasters that actually look like mini pallets so i started out with some scrap three quarter inch walnut and trimmed it down to a quarter inch strips on the table saw if you guys don’t know when i first started woodworking i built everything out of pallets as a lot of people do getting into this hobby in fact my first business name was brandon’s palette creations my friends still don’t let me live that one down but it got me to where i am today and to do what i love once i had several strips cut up i trimmed them all down to four inches over at the miter saw once i cut the first one i set up a stop block so i could make repeated cuts without having to measure every time this also ensures that they are all exactly the same length after i had all those cut i went back over to the table saw to cut what could be considered the pallet runners i guess i cut these all to half inch by three quarter inch and then also cut them to four inch links that’s all the parts we’re going to need for these cool little coasters i’m going to assemble everything using my new ryobi airstrike 18 gauge brad nailer in an attempt to make assembly easier i clamped a square to my assembly table and then use the pieces for the coasters as spacers i only glued the runners to the outer two and the center piece i used ca glue and accelerator then i flipped it over removed the spacers and secured them with 5 8 inch brad nails that takes care of the bottom then i flipped it over and just tried to space out four planks on top evenly spaced as i could using the same method to secure them once they were assembled i used a sanding sponge to knock down any of the sharp edges i decided to try a little finishing experiment with these coasters i wanted to try three different finishes the first one being rubio monocoat which is a hard oil and wax blend that i use a ton in the shop and i love it the only problem with it on these is there’s so many small nooks and crannies to get it in it took forever and then also you’re supposed to buff it back off so it took even longer to get the excess out of the spots for the second method i used cutting board oil and just poured it all over the whole thing capturing what didn’t stick in a bucket to be reused and then i just let it drain in a clean bucket this method worked pretty good but it still left kind of a lot of oil stuck between the planks and stuff like that but it eventually dried and turned out okay the third method is what i consider the best and most efficient way and that’s spray lacquer this was by far the easiest to apply and it looks good too i applied four coats here’s a side-by-side of all three let me know which one you guys like best another common gift people get for christmas a lot i noticed is a nice ball of wine but it would be cool to put it in a gift box of some sort and what’s better than a handmade gift box so we’re gonna go ahead and make one out of some white oak and some quarter inch walnut ply that i have first thing i’m going to do is come over to the table saw and then cut this down to the width i want which is five inches this piece is about four feet long which should be plenty for what we’re going to use it for i’m going to get this trimmed down to width and then i’m actually going to cut the grooves down the whole length of the board for the top and bottom to sit in because it’s easier to do that now rather than try and run little pieces through the table saw so we’ll get to doing that so if you’ve worked with plywood at all in the past you know it’s not exactly quarter inch or three quarter inch or whatever they say it is so let’s take a measurement here it’s a little bit less than a quarter so what that tells me is we can do a full quarter inch pass for the slot that the top is going to go in and have plenty of room for it to slide in now so got this depth gauge setter at a quarter you can use a ruler or whatever you don’t have to use one of these fancy tools and then we can cut two passes because this is the full kerf blade which is only an eighth inch so we’ll have to do a couple passes we’ll also do is transfer those marks down the end grain so i can see them because this will be on the bottom side just transfer those over here that way i know exactly where i need to cut i will use my fence to set it a quarter inch away and then make a cut and then just move it eighth inch and then make another cut but before i make that second cut i can look and make sure the edge of the blade is on that line so i don’t make a cut that’s too big or too small [Music] so a lot of times when you’re using a regular blade versus a dado stack to do a small dado like this you’ll end up with this strip in the center and you can just clear that out with a small chisel or even a screwdriver or just anything it’s real thin just anything to clear out the slot [Music] [Music] every wine bottle this style typically is about 12 inches this one’s a little bit less or maybe right at it so we’re going to shoot for 13 inches top to bottom on the inside so i’m going to head over to miter saw and start cutting this up i’ll end up cutting this kind of knot off here that way we start with a nice square edge this will be the bottom so i’ll cut that to the width of this board which is five inches and then i will go uh 14 and a half right i’m not good with numbers yeah 14 and a half and then another five and then another 14 and a half so we should have plenty of wood here and then i’ll show you what to do after that at the time i’m recording this video if you guys don’t follow along the channel that closely i just got in the new shop so this is my super sweet miter station for now it’s just a plastic bench but i will be making a proper miter station here in the near future [Applause] at this point we’re going to need to kind of keep track of what’s what these are obviously the sides don’t need to worry about that but the top and bottom are actually going to be different from this point forward so i’m just going to write on there bottom and top helps me keep track of things and the difference is going to be we’re going to go back and cut this top piece even with the bottom side of this groove here and that will allow the lid to slide in and out on the top side the bottom we’re going to leave alone because it’s going to be a fully captured panel to obviously keep that from sliding out and keep the wine bottle in but we’re going to go over the table saw and cut this off now so we’ve got all our pieces cut we can kind of mock it up now the only downside to this method some people may not like it i really don’t care that much on something i’m trying to do quickly and give away as a gift is you’re able to see these notches right here where the blade came all the way through if you really don’t like that you want to spend a little bit more time what you can do is take a quarter inch router with an edge guide or something come in as far as you need to to allow room for this which would be what half inch a little more whatever it is plunge down go over and come out and that will leave these ends closed so you won’t be able to see them or you could just do mitered corners and you won’t be able to see them that way either but for the sake of this video doing it quick and uh just that most people can do easily we’re doing it this way next step i’m going to clamp this together and get a measurement of how big our panels need to be with this floating panel method it’s going to be just that’s going to be floating we’re not going to glue it in we’re not going to make it exactly to fit so what we’re going to do is take this inside measurement add about 3 8 to it because it’s a quarter inch on both sides so that would be half inch but you don’t want to take up that whole room with the panel that way there’s room for the outside wood to move around as the seasons change and things like that so we’re going to take the inside measurement add a quarter uh what i say 3 8 of an inch and do the same thing this way that way the panel has about an eighth inch on two sides or sixteenth all the way around to move i almost made a mistake because the bottom will be that size but the top will not because we want the top to come all the way out to the edge perfect workbench measure this inside to out here so 14 all together let’s try to slide this in here it’s a little bit long so trim it back just a little bit so it sits flush up against that edge we go nice and flush so now i think we’re ready to do some sanding before we put it together it’s a lot easier to do it that way so i’ll get to sanding all this and then we’ll get it put together now we get to assembly this is the back side that i want to apply for the bottom kind of matches the inside actually so it looks pretty good but what we’re going to do is glue clamp get the bottom piece in there as well get everything nice and straight and then we can drill countersink and put our screws in and that’ll act as clamps so we can take the top clamp or these clamps off and it’ll pretty much be done so this is what i use for this it’s a tapered bit and then it’s got a 3 8 inch countersink up here that you can run down into the wood to clearance out some space for that dowel to go we’re going to be using 3 8 inch dowels obviously this is a dewalt i believe and you can find these in home depot around all the other drill bits they’re super handy i use them all the time obviously this one’s at the end of its life and i can’t find my new one unfortunately but it should work [Music] so my original plan for this was to use walnut dowels to give it some contrast but i can’t find any anywhere without driving like 45 minutes one way to pick them up so i just ran to home depot and grabbed this birch 3 8 dowel it was like a dollar fifty which is pretty good so i’m going to cut off like inch sections just to make sure i have plenty sticking out when i glue it in and then we’ll glue them in and then trim them off once they’re dry so all i’m doing here is just giving a little round over so it’ll go into the hole a little easier now we can glue them in you can hear that sound change when you get to the bottom [Music] i realized a couple mistakes i’ve made this morning already one is i didn’t have my mic plugged into the right port so the audio probably sounded horrible um apologize that made it into the final video and also this will probably stay together a lot better if i actually put the screws in before the plugs so we’re gonna pull these back out put the screws in and then uh put all the plugs back in it happens there we go just gotta get the right technique apparently wiggling i think i can reuse these most of them all right let’s put the screws in and then and then the plugs second i need more screws what is happening to me today got em i think these are longer oh well be fine this driver’s kinda loud but it has tons of power all right now the plugs re-glue make it a mess okay now we wait while that glue dries i want to take a second thank the sponsor today’s video which is home depot they invited me to be part of the prospective program for 2021 and 22. for this project they sent me out the rigid four piece toolkit which includes the driver drill a reciprocating saw as well as a multi-tool which you’ll see in just a second i think it’s a good thing to have in the shop i don’t see a lot of woodworkers using the multi-tools so i’m excited to incorporate it into my future projects and see how we can use it around a wood shop and also they sent me the ryobi 18 gauge and 16 gauge brad nailers cordless so you want to drag the airline around which will be nice i’ve actually wanted this for quite a while so i’m glad i have it in the shop now to utilize i’ll leave links to these and everything else i use in the video down in the description below for you guys to check out and i appreciate the support all right back to the video all right it’s been about an hour hour and a half so we got plenty of time take clamps off and now what i want to do is utilize that multi-tool i was talking about so here’s the multi-tool i got from them it’s the ridgid it is uh really ergonomic i like that best about it also it’s a tool-less change so you just pop this up take the blade off put a new one on it’s adjustable speed um but mostly it’s light and it’s easy to handle so i got this fine toothed flush trim blade here but what i want to do first is put down some tape to try to protect this normally what i do is use like a a japanese pole saw or flush cut saw of some sort to trim these off but i want to try this down see how it works [Music] pretty good [Music] see it kind of tore the tape up but i don’t think it messed up the wood so tape did its job now i can just sand those flush and be good to go get the rest of them cut off [Music] the last piece i want to put on here is a little handle for the top i’ll just glue it on there this is a piece of scrap from the coasters we just made and that way you’ll have some way to grab it to slide the lid in and out so i’ll get that glued on and we can continue to a final sand and put some finish on this thing to see what it looks like before i add this on i want to actually do a little bit of sanding so i just want to break over the corners a little bit of saw marks in there i want to very lightly sand the corners of this ply i don’t want to do too much because then it’ll reveal the mdf but i also don’t want it to splinter looks pretty good all right and get it glued on try to be sparing with the glue so i don’t want it to i do want to come out of the bottle however well that’s nice this glue i’m using is a quick and thick from tybon and it actually dries clear so if you get a little bit of squeeze out it’s not going to be the end of the world just going to utilize the edge of my bench try to get it pretty centered just clamp it down this glue dries pretty fast so i shouldn’t have to leave it for too long let that dry and move on to final sanding the box [Music] it’s time for finish i’m going to go back to that hard oil and wax blend i really like this stuff especially when it’s big flat surfaces like this so you don’t have to worry about getting into a bunch of small crevices and stuff like the coasters stuff works really good on like tables and desks i just like the natural color and sheen that it leaves no shininess a plasticky look etc so now we’ve got the bottom and the top finished i’m gonna let it sit for a while let it cure before i’ve actually put it together so we’ll move on to the third and final project while this dries and then we’ll come back and show you the finished product of this so when i started this video i knew i wanted to do three projects you give away for christmas gifts or sell that you could do quickly in the shop and i knew i wanted to do the coasters and the wine box but i wasn’t quite sure what i wanted the third one to be i thought about a serving tray or cutting board but everybody makes those and i have videos on those already so i thought maybe it’d be cool to do a nice modern style pencil holder and these pallet coasters kind of gave me the inspiration to do that so let’s get into that build so i don’t know about you but walnut is one of my favorite woods to work with i found this piece in my cutoff pile it’s three and a half inches wide 24 inches long and three quarters of an inch thick so i thought about doing this with just the full three-quarter but i think that’ll be a little bit too bulky for what i’m going for so i’m gonna run over the planer and plane this down to a half inch i say run over to the planer like it’s mounted somewhere i can actually use it nope it’s a nightmare took it out and a potential back injury but for now it is what it is i need to build a cart for that thing did not foresee this when i was setting the shop up it’s fine we have an extension cord and a plug-in look at that seems safe no trip hazards or nothing i’m just gonna pretend this doesn’t isn’t really how i do things it is 80 of the time so much prep for one board [Music] all right now this thing is down to a half inch thick what i’m going to do is set my fence to a half inch so i get half inch by half inch squares and just cut as many strips as i can get out of this and then we will cut them down to final length all right we got our strips all cut ended up with five of them what i’m gonna do now is cut them down into four inch sections because i want this to be four by four and then about five inches tall or something in that area for the base i think i might actually use a different wood i just like using contrasting colors so i think it’ll be kind of cool but what i’m going to do is get out a miter gauge and cut these with that because it’s a little safer than trying to do it on the miter saw and it’ll leave a little cleaner cut so this is a pretty glorified miter gauge you can use the one that comes either saw or a sled or anything like that but i like this one because it has the stop block so i can set it up for four inches and just make repeated cuts and i know they’re all going to be exactly the same now that all the pieces are cut we can start assembling it’s a lot all right i got the square set up here like we did with the coasters just try to keep everything as square as possible and i also have some type onto dark which is made for like walnut and darker woods that way if you do get some squeeze out which i’m sure i will it’s not as noticeable as the white glue and then we’ll be securing it all with some one inch long 18 gauge brad nails with the ryobi airstrike so what i want to do is the bottom two will be the top of it actually and so i want to drive nails from the bottom up so this would be the top put a piece on drive from the bottom up and then each time i put a nail in i want to kind of offset it from the next one so the brad nails aren’t hitting each other so you don’t want to do all in the center if that makes sense once we get to the bottom we’ll just put the bottom on nailed from the bottom you won’t see any of the brad nails hopefully at least that’s a thought so once i flipped it over it looks good but i don’t really like how these are open i think if i put these small pieces in here it’ll give it a lot more finished look so i cut some to size and now i’ll just glue them in with clamps instead of the brad nailer so you don’t see the brads while that’s dry i’m going to cut the piece for the base this is 4×4 square so i’m going to cut a piece that’s 5×5 out of this white oak that’s part of the wood i use for that box it’ll be a little contrasting again and i’ll probably throw a chamfer or something on there just to dress it up a little bit instead of using a router i have my table saw blade set to 45 degrees and then i have my fence set to four and three quarter so i’ll basically be just taking a quarter inch chamfer off so i’ll just run this through on each side and see what it looks like it may take a little more off i’m not sure yet so i got this out of the clamps and i made another base off camera actually it’s the same thing just with a bigger chamfer just to see which one i liked better and i’m not sure this one looks pretty good but it’s kind of bulky i think but this one i think i like best because the chamfer comes all the way up to the base it just looks kind of cool let me know in the comments down below which one you guys would pick but i think i’m gonna go with this one then what i’m doing is just taking the sanding sponge and just breaking over the really sharp corners i don’t want to like round it over anything i just want to make it to where there’s not going to be any splinters or anything like that i can get it mounted to the base and then we’ll get some finish on there i really like to have a big overhang on my assembly table so i can utilize it for clamping so what i’ll do is just get it close here put some glue on and then i’ll use a clamp and clamp the whole thing from the top probably put a board across here just to have an even clamping pressure and that way the foot of the clamp can get underneath my table and clamp from the center so should be good actually what i can do is use the other base i was gonna use make sure it’s all fairly centered i think we’re good maybe i should glue this on and put a candle in it or something sirens i thought ambulances went fast taking their time while that cures i’ll turn my attention back to the wine box it’s all cured up now well mostly cured it’s been a day so let’s see if the top goes in first of all got to push down on just a little bit because it’s warped but i’m kind of glad it’s warped because like i said that tension will actually keep the lid fairly snug but looks pretty good i think some people like i said might not like these little saw saw holes and like i said you could get rid of those by just using a router with a quarter inch bit instead and stopping before you get to the end but i think it’s all right and the plugs look pretty good i’d rather have done walnut ones but it’s all right so i got this uh cardboard shredding stuff i think that will be good for this i thought about using like wood shavings or something but i had this on hand so we’re gonna use this instead just put a little bit in the bottom there put the wine bottle in and then kind of stuff it around it make it a mess it looks pretty good and once i actually go to put the actual bottle of wine in here i’ll probably put some tissue paper or something over the top or maybe just cover it with more of this before slide the lid on to keep it from moving around and hitting the lid but that’ll work looks pretty good i think what do you guys think all right should be dry now or cured whatever you want to call it and that’s kind of our final product minus finish i think what i’m going to do is uh use the lacquer spray on this as well because of all these small areas i think the lacquer will be the easiest so let’s get some finish on it see what it looks like [Music] [Music] my and there we go three quick projects done if you guys like these small types of projects and these videos with several things in them i’ll leave another one linked right there that’s real similar you can check out after this special thanks to home depot for sponsoring this video i hope this inspires you guys to get out in the shop make something cool even if it’s small and quick like these some you can do over the weekend and leave me a comment down below letting me know the things you make in the shop to give away over the holidays i really appreciate the support and we’ll see you guys on the next one …
“+10,000 Step By Step Plans …even if you don’t have a large workshop or expensive tools!“ Download Today! 👈